If you found value in this post, consider following me on X @davidpuplava for more valuable information about Game Dev, OrchardCore, C#/.NET and other topics.
The Wait is Over
I've waited a long time for AT&T Fiber to arrive in my neighborhood and it is finally here. Naturally I signed up as soon as I could and scheduled my fiber installation at their next available slot.
The installation went great. The AT&T technician, Richard, was very knowledgeable and was able to install the AT&T Gateway in my server closet on the other side of my house from where the fiber entered my home.
AT&T's default configuration is to leave you with working WIFI and you can connect to and start browsing the internet. This makes sense because most people do not wire their houses with ethernet.
As a software developer tech nerd, I'm not most people. My appetite for punishment lead me to wire my house for ethernet, at least for those devices that benefit from high throughput like my work computer and streaming devices.
Naturally, I have my own router with a custom configuration to handle all of that.
Additionally, this router needs to "live on the edge" as they say to handle some services that I host out of my own homelab.
What this means is I need to "bring my own router" to use with the AT&T Gateway that was installed.
Plug it in, and it works! Sort of...
To use your own router with AT&T's BGW320-505 gateway, you simply plug it into one of the yellow 1Gb ethernet ports on the back of the device. The blue 5Gb strongly recommends that you use CAT 7 ethernet, which I honestly thought was a made up category of ethernet but turns out I'm just too old to keep up with technology.
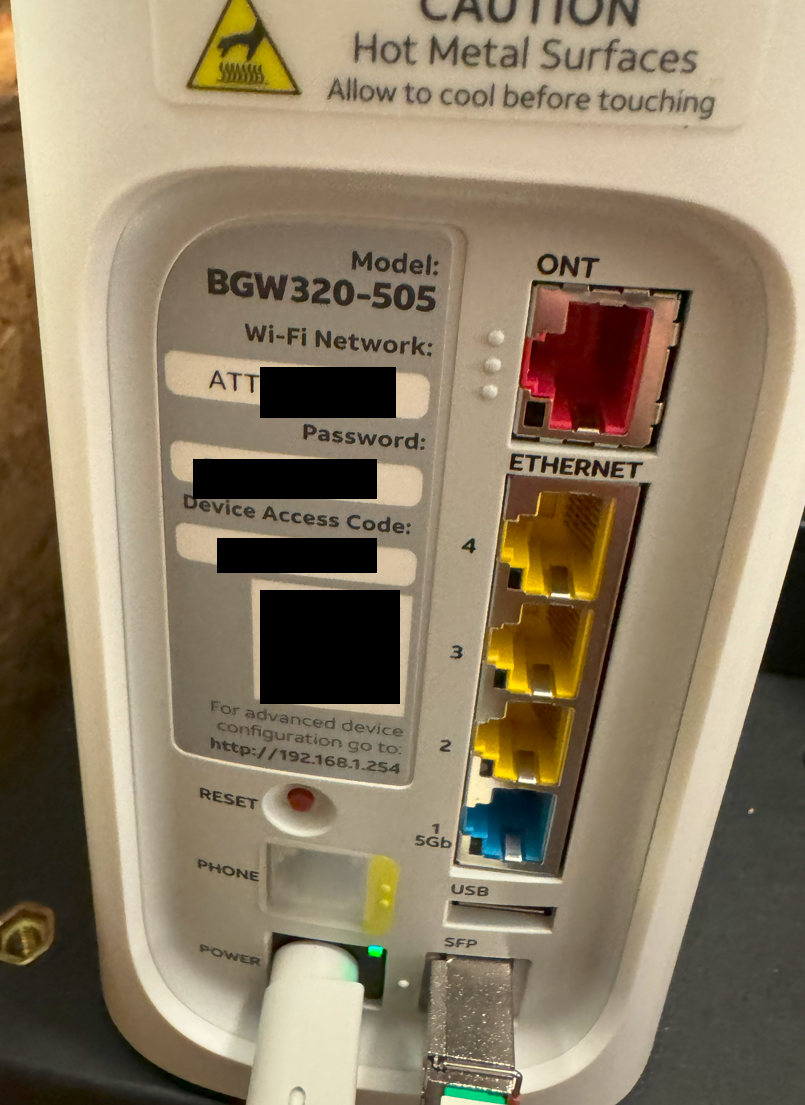
You then use a computer to connect to your AT&T gateway accessing the default address http://192.168.1.254 to see your Gateway settings.
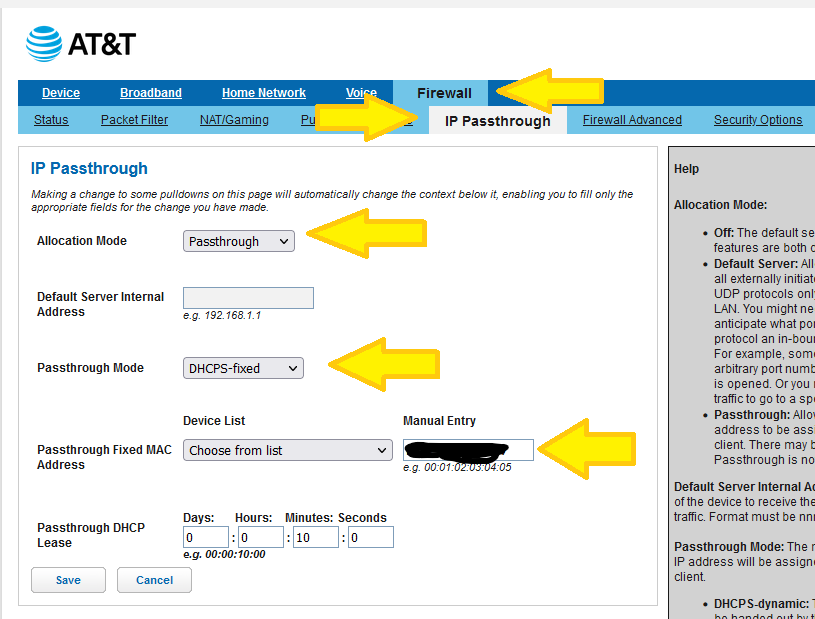
Navigate to the Firewall page, and then the IP Passthrough subpage and do the following:
- Set
Allocation ModetoPassthroughto allow the AT&T Gateway to pass your WAN IP address to your own router. - Set
Passthrough ModetoDHCPS-fixedso you can specify your router as the client to receive the passed through WAN IP (rather than the first client that connects). - In the
Passthrough Fixed MAC Addressenter your router's MAC address which you can find on the back or side sticker physically attached to your router. You can also click theChoose from listto see the list of connected devices; if it's obvious which device is your router, select it to automatically fill in theManual Entrybox with your router's MAC address.
After that, I restarted both the AT&T Gateway, and my own router and everything worked great!
Until...
I Couldn't Connect to the Internet
When I woke up the next morning, nothing worked. I couldn't connect to the internet, I couldn't connect to the AT&T Gateway, and I couldn't connect to my own router.
I did the usual steps of checking my ipconfig settings, ping and tracert but nothing seemed to work.
Oddly enough, email and a couple other apps would update with notifications as if it sort of worked, but everything was intermittent.
To connect to my AT&T Gateway, I had to explicitly connect to the default WIFI and then everything from that computer worked; I could browse the internet, reach the router etc.
I finally found AT&T's article on how to use your own router and that helped me fix the issue.
The key issue for me was that AT&T's Gateway used the same subnet 192.168.1.0/24 as my own router's subnet.
Even though the ranges didn't overlap, the power struggle was real and cause all sorts of issues.
The key point from AT&T's article was this:

After I read that, resolving the issue was as simple as changing the default subnet for the AT&T Gateway.
Fixing the Problem
Follow these steps to resolve the subnet conflict.
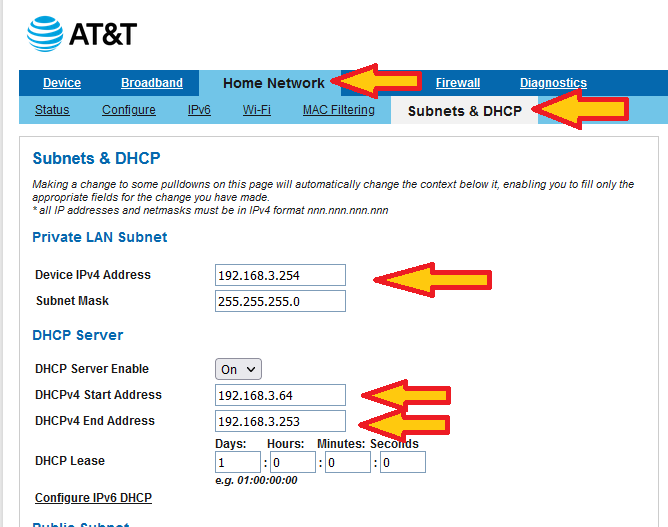
- Navigate to your AT&T configuration page at http://192.168.1.254.
- Go to the
Home Networktab. - Select the
Subnets & DHCPsub page. - Change the
Device IPv4 Addressto use a different IP address, for example192.168.3.254. - Update the DHCPv4 Start Address to use the subnet, in this case
192.168.3.x, so enter the value192.168.3.64. Notice here, I'm only changing the third octet. - Do the same for the DHCPv4 End Address, here I enter
192.168.3.253. - Click Save at the bottom of the screen.
I restarted both my AT&T Gateway and my router, just for good measure but I don't actually think it's necessary.
After I made the above change, everything started working.
One Last Thing
Since I already had a WIFI Access Point, I wanted to avoid having the AT&T Gateway Access Point WIFI radio's from interfering, so I went ahead and turned them off.
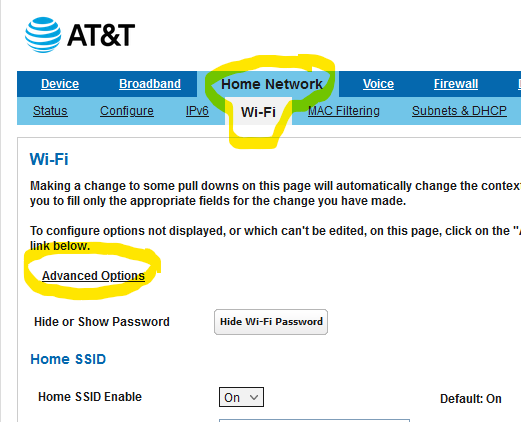
- Navigate over to the
Home Networktab. - Select the
Wi-Fisub page. - Click the
Advanced Optionsclick to see more options displayed.
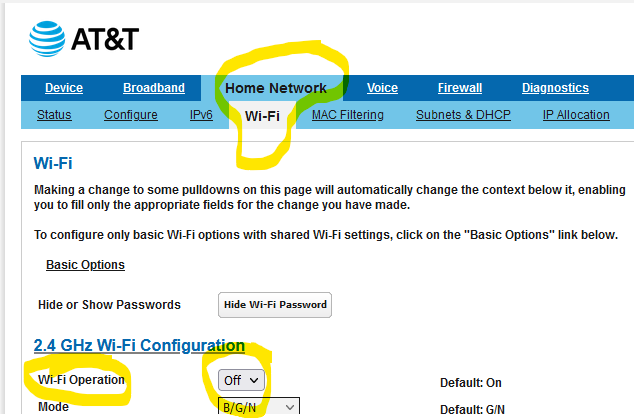
- From here, I set the
Wi-Fi OperationtoOfffor the2.4 GHz Wi-Fi Configuration.
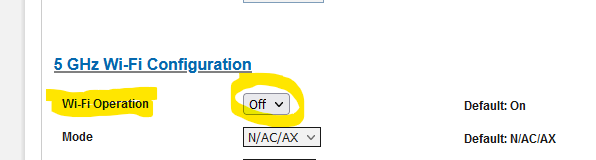
- Next, under the
5 GHz Wi-Fi Configurationsection, I setWi-Fi OperationtoOff.
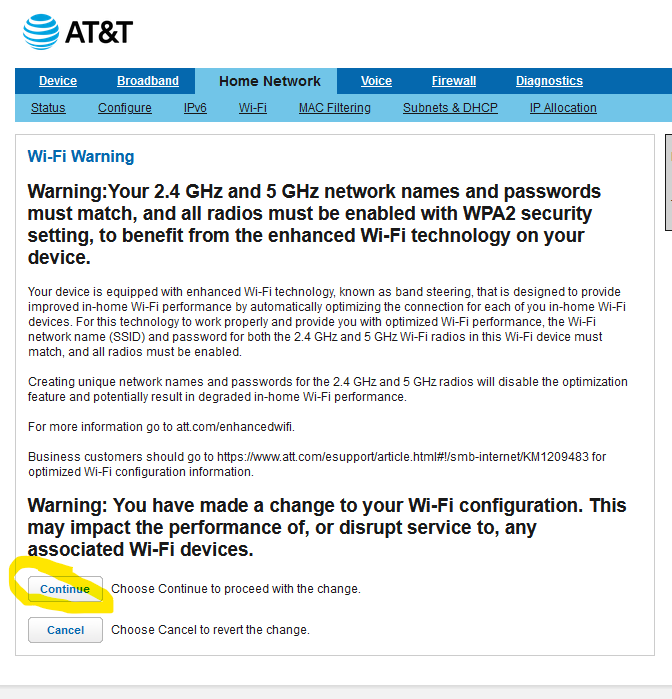
- Lastly, don't forget to click the
Save...button.

- When you see this warning screen, go ahead and click the
Continu.button to disable the Wi-Fi radios on the AT&T Gateway.
That's a Wrap!
Thanks for reading and I hope you found this article useful if you run into the same issues connecting your own router to an AT&T Gateway.
Special thanks to this YouTube video as well which confirmed what I thought need to be done to use my own router.